This guide will assume that you have a domain hosted with writhem.com named 'crimsonlinks.com'. This is not a real domain but every time you see it, you should replace it with the domain you have hosted with WritheM Web Solutions. Additionally we will assume your name is Thomas Est and your GMail is test@gmail.com.
There are a few different ways we can set things up, each with their own benefits and drawbacks. The two easiest methods are:
- With Forwarders.
- With POP3/SMTP.
The Forwarders method lets you create as many email addresses @crimsonlinks.com and all the email will be forwarded to your test@gmail.com inbox. This means that email sent to you does not contribute to your hosting storage quota. It's just passed along and lets Google handle the email portion for you. The downside is that the only way to check your @crimsonlinks.com emails is to log into GMail. Additionally you are unable to send emails that actually come from this account. They instead will be on-behalf-of which may reveal your personal account to the recipient.
The POP3/SMTP method requires you to set up an inbox for each address @crimsonlinks.com that you want to receive email at. Emails will be stored on the WritheM Web Solutions server, and will contribute to the total hard drive space that is allocated to your purchased hosting plan. Applications like Firebird, Outlook, and Windows Mail are especially good at accessing these types of inboxes. The downside is that if one of your clients that reads your email is set to download from the server and delete, it doesn't sync especially well with the other clients. This means that you could read something on your computer only to find it unavailable for reading on your phone after the fact... because it's now on your computer. Or vice-versa.
We suggest a combination of the two. Set up Forwarders for receiving, and SMTP for sending. This keeps things easier for you, and reduces the systems you have to maintain. Additionally the experience is consistent across all devices. Here are the steps for setting up this hybrid setup.
Setting up Forwarders + SMTP:
- The first thing to do is add an email forwarder for your domain in the WritheM cPanel. Once in find the section Email and the link Forwarders.
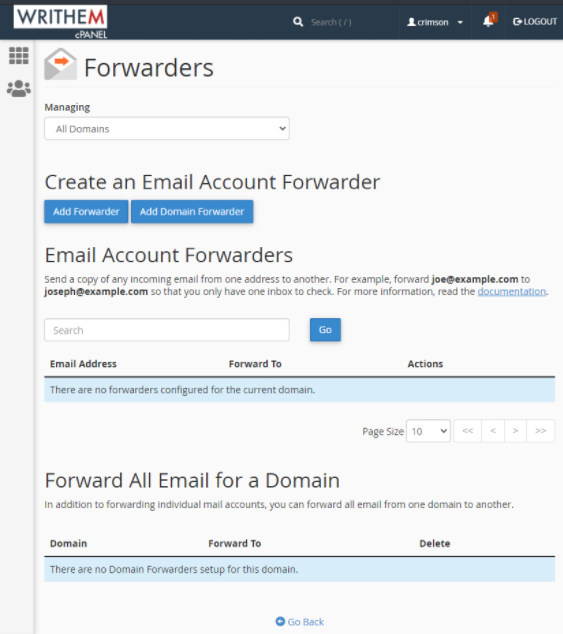
- Click
 and fill out the information then click Add Forwarder at the bottom of the page.
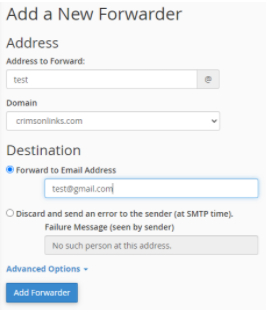

You may repeat step 2 as many times as you like to make sure that every email @crimsonlinks.com that you want sent will be. - That takes care of receiving email for those addresses, now we need to set up a method to send email. Click go back or the WRITHEM cPanel logo at the top to return to your dashboard. From there we're going to find the link titled:
 and then the Create button.
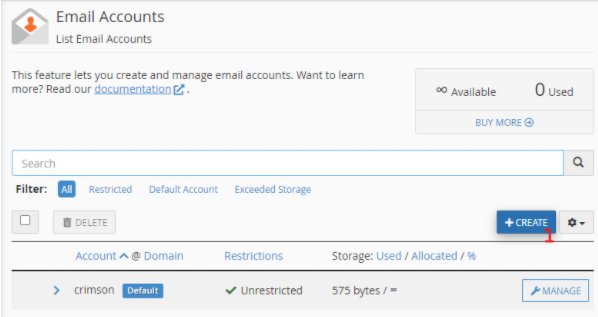
- Enter in a username/password of your choosing. This will be the email address that emails are sent from. You do have the option of setting a further 'on-behalf-of' later in GMail so we suggest only creating one account that you will send from. Something like info@crimsonlinks.com feels right. When you've entered all of the information click Create at the bottom of the page.
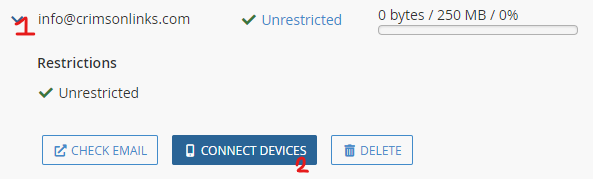
- If we click the chevron on the list of emails that we just created you'll see a Connect Devices button. This page will have some information we need in a later step. We don't have to click it now, but let's keep this window open and proceed to the next step.
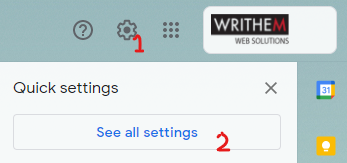
- Log into your personal GMail account and locate the cog at the top right of your Inbox then See all settings. (Your inbox may have different colours and no logo in the top right here)
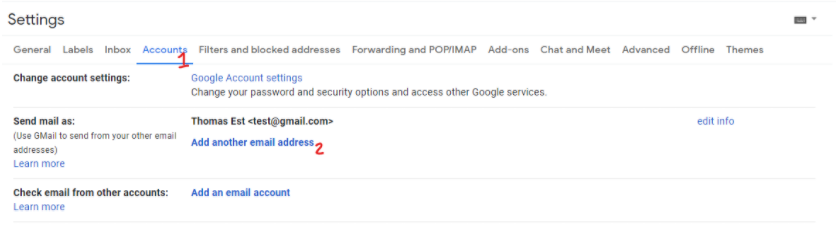
- From the Accounts tab find the email addresses you're currently able to send mail as to add a new alias. Click Add another email address. This will let us set up our
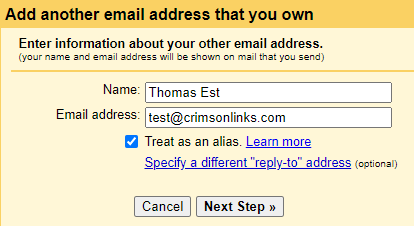
- A new window will pop-up asking for your display name and email. This is the name you want people to see when you send them emails. If you would like something like TEst or ThomasE instead of Thomas Est, now is your change to change that. Leave 'Treat as an alias' checked. The different reply-to address is if you want to send email FROM test@crimsonlinks.com but have clients reply-to something like info@crimsonlinks.com. Visually they see that it's from you, but when they reply it auto-populates a different address. It is worth noting that some email clients do not respect this option.
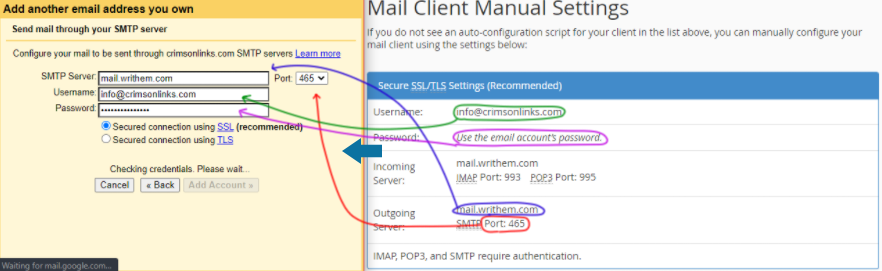
- Now is the time to return to that window we kept open in Step 5. We need to know the server settings for our domain. Return to that window and click the Connect Devices if you haven't already. Scroll past the Automatic settings and find the section for Manual Settings. GMail is asking for our Outgoing SMTP Server information and our login. The section in blue should have all the information we need. Once we transcribe the settings click Add Account.
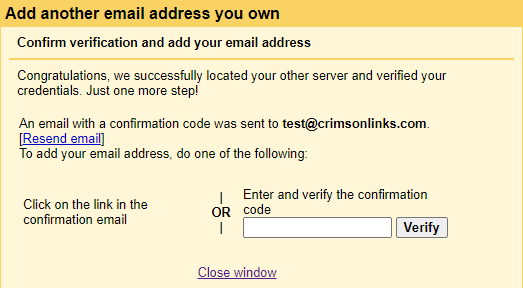
- You will now receive an email that should be in the inbox of your GMail account. Enter the verification code in that email into this new window and you will be done with setting up your GMail to send/receive your @crimsonlinks.com email.
When you are composing a new email from GMail, you will now have an additional option to send From. 
By default, all emails received on your test@gmail.com address will be responded to from your test@gmail.com and all emails received on your test@crimsonlinks.com address will be responded to from your test@crimsonlinks.com address.
No additional settings will be required if you are using the GMail android or iOS apps as these settings will sync to your device.
